In this post we look at a few odds and ends that arose during the stabilisation exercise: Dealing with frame defects and splice bumps, adding frame numbers, and re-combining frames into a video file.
Dealing with Frame Defects
An unexpected challenge which arose when stabilising the thousands of frames in each sequence, was that some frames had defects which obscured one or more white corner dots and made it impossible to measure the movement of these corner dots.
This yielded spurious measurements which completely messed up the calculation of displacement, rotation and vertical scaling for the frame as a whole.
In the end it turned out possible to use statistics to rescue this situation. If one of the corner dots had a measured x or y offset which was very different from the other corners — i.e. a statistical outlier — then the data from this corner was simply ignored. Sometimes this made calculation of rotation or vertical scaling impossible due to insufficient data. In these cases the rotation was assumed to be zero degrees and the scaling 1.0 (i.e. 100% or scaling unchanged).
Calculating displacement required only one corner dot at a minimum — so as long as at least one corner dot was intact, displacement could still be determined and corrected. And displacement (which in fact is mainly vertical in the direction of film motion) was by far the dominant part of the jitter.
Correcting Splice Bumps
An earlier post Adjusting Framing and Levels in Final Cut Pro X mentioned “splice bumps” introduced by the Spirit Datacine when a physical splice in the film passes through the film gate and it momentarily loses synchronisation. This creates a “bump” lasting typically less than a second. The frame image jumps vertically then gradually moves back to its correct position.
Splice bumps are rather like a very large jitter movement. Consequently they turned out to be repairable using the stabilisation system. Each bump was processed as a separate short sequence with settings that allowed for a very large vertical movement of the frame. The results were excellent.
Adding Image Numbers to Each Frame Image
When you’re working with tens of thousands of video frames as individual images which you want to re-combine into a video, how on earth do you keep track of frame numbers?
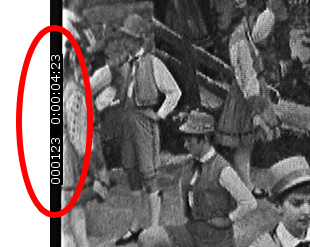
Well, firstly, the name of each image file includes the frame number — for example frame-000123.tif. This way the frame images will appear in the correct order in the file browser.
But I wanted to be sure that the frame numbering was preserved during the entire process of going from video to frame image files and back to video again. To do this, I modified the stabilisation software to tattoo an image number and a timecode into the left edge of each frame image — something like the old edge numbers on cine film. Here’s an example for frame 123 with a timecode of 4 seconds, 23 frames:
Re-Combining Frame Images into a Video File
After the stabilisation of individual frames was satisfactorily completed, they needed to be combined back into a single video file.
The excellent open-source tool ffmpeg came to the rescue here. ffmpeg is a “command line” tool which you run from a terminal window. Typing the following command for example will recombine the 6895 frames in a particular sequence into a video file named output.mov using Apple Prores encoding:
The starting frame number in this case is 75 and the image files to be combined have file names in the form stab-000075.tif (using frame 75 as an example; stab meaning “stabilised”).
That’s it for the technical detail. The next post will summarise the steps in this stabilisation process, then we’ll look an example of the results achieved.