In the previous post we established the need to downsample the high resolution 2K scans to a lower resolution for PAL SD release. We need to adjust this downsampling so that:
- The overscan (i.e. the area of the film frame beyond the boundaries of the video raster) is preserved.
- The dimensions of the video raster (after downsampling) are slightly larger than the PAL SD frame size of 720 x 576 pixels. This will allow final cropping to remove a little “bleed” around the edges of the video raster to produce a PAL SD frame in which the video raster (i.e. the original television image) neatly fills the frame.
Preserving the overscan implies that the downsampled video will have a larger frame size than PAL SD — in fact a non standard frame size which we will refer to as PAL SD+.
Let’s now look more closely at the calculations needed to work out the scale factor for downsampling and the actual dimensions of this PAL SD+ frame. Once we have these numbers we can plug them into a video downsampling tool, such as Apple’s Compressor.
The following diagram (Figure 1) explains the process:
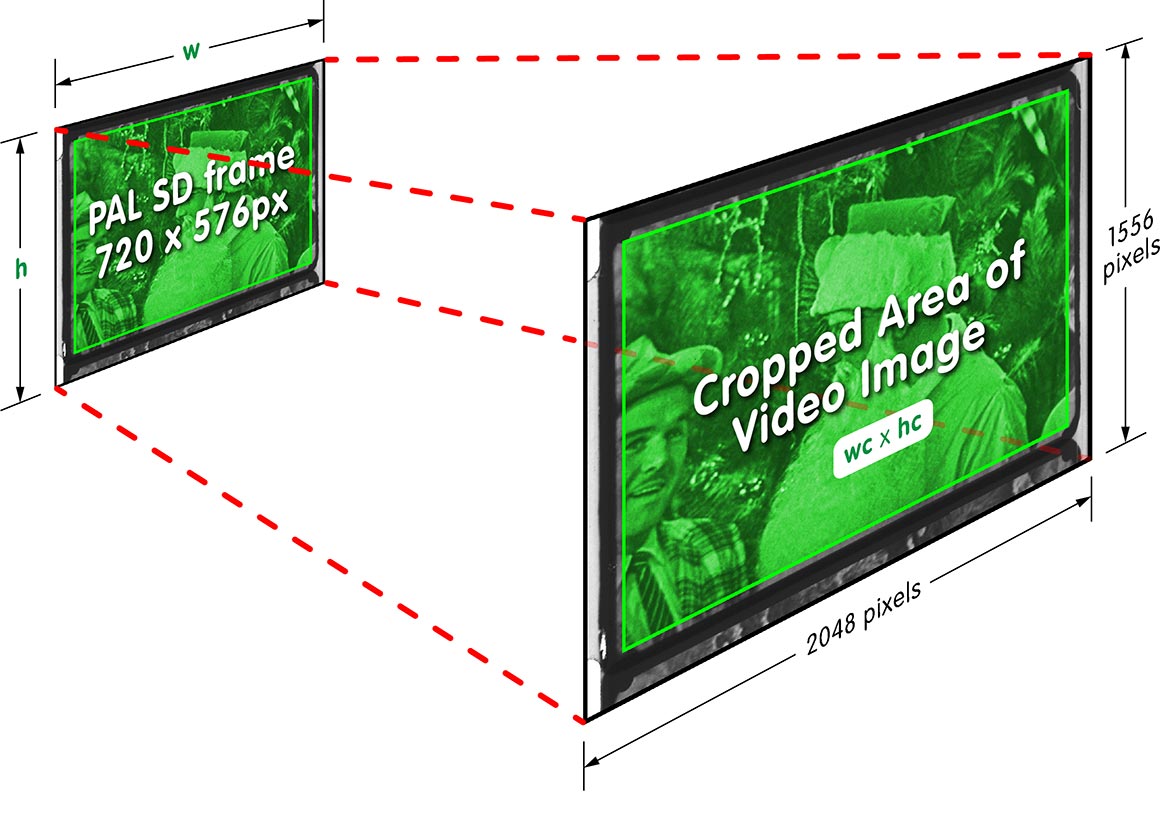
The Mathematics of Downsampling
In Figure 1, the 2K image is on the right. As you can see, the scanned area of the film frame (the outer black border) extends beyond the edge of the video raster (notice sprocket holes in the left corners). The dimensions of this 2K frame are 2048 pixels wide by 1556 pixels high.
The area shaded green shows the optimal cropping of the video raster — just inside its boundary. This is the area of the video image we want for the eventual PAL SD version.
The dotted red lines indicate the downsampling process. The downsampled image is shown on the left. We want the green cropped area in the downsampled image to have the dimensions of a PAL SD frame, which are 720 x 576 pixels.
To achieve this, the outer dimensions of the downsampled frame (with the black border) will need to be larger than this and are shown as w x h.
If the green area shown in the 2K frame does not have the same aspect ratio as a PAL SD frame, then the downsampling will be asymmetrical — i.e. the scale factor will need to be different in the horizontal and vertical axes. In fact this will almost always be the case due to the effect of “Pixel Aspect Ratio”, which we will discuss in more detail in the next blog post.
For the moment, we can state the following:
Horizontal scale factor = w / 2048
Vertical scale factor = h / 1556
But what are the values of w and h?
To work that out we need to know the dimensions of the green area in the 2K image before downsampling. This can only be determined through measurement. In fact, since the video raster in the old kines can change size slightly over the duration of a full reel, it’s necessary to review the scans and sample the width and height at a number of places then choose the minimum width and height value which will ensure the video raster has a clean edge after final cropping.
Assume the dimensions of the cropped area are wc and hc.
Then:
w = (2048 / wc) x 720
h = (1556 / hc) x 576
These calculations become tedious when one has to do them repeatedly, so I wrote a little Ruby script to do them and produce a report which can be saved to document the process and the settings used. Here is a sample output of this script for the “Marianne” (1963) kine scan:
==================================================
Production: Marianne
Segment: Interim DVDs March 2014: 2K scan to SD+
Calc date: 2015-04-21 16:41:30 +1000
COMPRESSOR SETTINGS
-------------------
Frame Size: 756 x 607
Pixel Aspect Ratio: 1.0
Cropping (Top, Bottom, Left, Right): 0, 0, 0, 0
Padding (Top, Bottom, Left, Right): 0, 0, 0, 0
SOURCE STATISTICS
-----------------
Source width: 2048
Source height: 1556
Source aspect ratio: 1.3162
Final source crop width: 1950
Final source crop height: 1477
Final source crop aspect ratio: 1.3202
Working source crop width: 2048
Working source crop height: 1556
Working crop aspect ratio: 1.3162
TARGET STATISTICS
-----------------
Final target width: 720
Final target height: 576
Final target aspect ratio: 1.25
Working target width: 756 (756.18)
Working target height: 607 (606.81)
Working Target aspect ratio: 1.2462
PIXEL SCALING IN COMPRESSOR
---------------------------
Horizontal scale factor: 0.369231
Vertical scale factor: 0.38998
Scaling assymmetry (h/v): 0.9468 (-5.32%)
Most downsampling tools (e.g. Apple Compressor) require the target frame width and height. These are shown above as “Working target width” and “Working target height”.
Note also the final section “PIXEL SCALING IN COMPRESSOR” where we see that the horizontal and vertical scale factors are not the same.
More on that in the next post about “The Mysteries of Pixel Aspect Ratio”.